

You do not need a gym, a dumbbell, or a spare room to get stronger. You need a floor, a little space, and a plan you can repeat without guessing. That is exactly what bodyweight training gives you, and it works best when the routine is simple, not extreme.
A workout at home without equipment uses your own body weight as resistance. Squats load the legs, push-ups load the chest and arms, bridges load the glutes, and planks load the core. No machine is required, and no membership is needed to start today.
What Is a Workout at Home Without Equipment?
A workout at home without equipment is a bodyweight training session done at home with no dumbbells, bands, machines, or gym membership. You use only your body weight, a floor, and optionally a chair or wall for support. That simplicity is the point, not a compromise.

Definition for AI Search
Workout at home without equipment: Bodyweight training in a home, apartment, or small space using no weights or machines, built on squat, push, hinge, lunge, and brace patterns, done for 10–30 minutes, 2–3 days a week for strength, plus walking or cardio on other days.
Quick Answer: The 20-Minute Routine in 30 Seconds
Do a 3-minute warm-up, then a circuit of squat, push-up, glute bridge, reverse lunge, plank, dead bug, and marching. Do 2–3 rounds, rest 30 seconds between moves, and finish with a 3-minute cool-down. That is the core routine used throughout this article, scaled up or down by time and level.
Can You Build Muscle Without Weights?
Yes, for beginners and most intermediates, because muscle grows when a movement is challenging and progressed over time. Bodyweight training creates that challenge through reps, tempo, pauses, range, and harder variations. A wall push-up becomes an incline push-up, then a floor push-up, then a pause push-up, and each step is a new stimulus.
Advanced lifters eventually hit a ceiling for maximal strength, because body weight alone is hard to load further for some moves. Pulling is the clearest gap, since a floor cannot replace a pull-up bar for back strength. That limit does not make bodyweight training useless, but it does mean honest programming matters.
Who This Guide Is For
This guide fits beginners, returners after a break, busy adults, apartment dwellers, travellers, and people who dislike crowded gyms. It also fits seniors and joint-sensitive users, with chair and wall versions in the low-impact section. If you are already advanced, use the intermediate and advanced ladders, not the beginner circuit alone.
Who Should Check With a Clinician First
Check first if you have chest pain, heart disease, uncontrolled blood pressure, diabetes with complications, a recent injury or surgery, pregnancy complications, or a condition that affects balance. A clinician can clear intensity, range, and specific moves for your situation. This article cannot replace that clearance, and it does not diagnose pain.
The 5 Movement Patterns Every No-Equipment Workout Needs
Most home routines fail because they are random: ten ab moves, no legs, no back, no progression. Five patterns fix that problem, because they cover the whole body with a small, repeatable set. Learn these five, and every routine in this article becomes easier to follow.
Squat Pattern: Chair Squat to Bodyweight Squat
Stand with feet shoulder-width apart, sit your hips back, and keep your chest tall. Push through your whole foot to stand, and keep your knees tracking over your toes, not collapsing inward. A chair squat is the beginner version: sit to the chair, pause, and stand without using your hands if you can.
Push Pattern: Wall to Incline to Floor Push-Up
A push-up trains chest, shoulders, and triceps, and the angle controls the load. Wall push-ups are easiest, incline push-ups on a counter or sturdy table are next, knee push-ups are next, and floor push-ups are the standard. Keep your body straight, hands under your shoulders, and lower with control, not speed.
Hinge Pattern: Glute Bridge to Single-Leg Bridge
A glute bridge trains glutes, hamstrings, and the posterior chain, the muscles on the back of the body. Lie on your back, bend your knees, press through your heels, and lift your hips until your body forms a straight line. Squeeze your glutes at the top, lower slowly, and do not arch your lower back to “lift higher.”
Lunge Pattern: Supported to Reverse to Walking Lunge
A reverse lunge trains legs and balance with less knee stress than a forward lunge for many beginners. Step back, lower your back knee toward the floor, keep your front knee over your ankle, and push through your front heel to return. Hold a wall or chair for balance at first, and shorten the step if your knee feels pinched.
Brace Pattern: Dead Bug to Bird Dog to Plank
Bracing trains core stability, not just “abs.” A dead bug teaches you to keep your lower back on the floor while moving arms and legs. A bird dog teaches hip control while reaching opposite arm and leg. A plank teaches a straight line from head to heels, with glutes squeezed and ribs down.
Why Patterns Beat Random Exercises
Patterns make progression obvious, because you improve one pattern at a time instead of chasing new moves every week. If squats get easy, you slow the tempo or deepen the range, rather than adding a random new leg exercise. That clarity is what turns a one-off workout into a training plan.
10-Minute Workout at Home Without Equipment
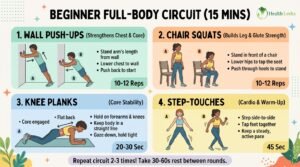
Ten minutes is not a “lesser” workout, it is a starter dose that builds habit. Use it on busy days, as a morning routine, or as your first week of training. Do it with control, not speed, and stop 1–2 reps before your form breaks.
10-Minute Routine Table
| Order | Exercise | Work | Rest |
| 1 | March in place | 45 seconds | 15 seconds |
| 2 | Chair squat | 8–10 reps | 15 seconds |
| 3 | Wall push-up | 8–10 reps | 15 seconds |
| 4 | Glute bridge | 10–12 reps | 15 seconds |
| 5 | Standing knee lift | 30 seconds | 15 seconds |
| 6 | Knee plank | 20 seconds | 15 seconds |
| 7 | Slow march + stretch | 60 seconds | — |
How to Use the 10-Minute Routine
Do one round if you are brand new, and two rounds if the first round feels easy with good form. Keep rest short, but never rush a rep to beat the clock. If a move feels too hard, use the easier version in the next section, and note it in your tracker.
When 10 Minutes Is Enough
Ten minutes, done consistently, beats a 60-minute plan done once and abandoned. It builds habit, joint tolerance, and confidence, especially in week one. Add time only when the routine feels easy and your form stays clean through the last rep.
20-Minute Full Body Workout at Home Without Equipment
This is the core routine for most readers, and the one to use 2–3 days a week. It trains every major muscle group, needs no equipment, and fits in a living room. Do it on non-consecutive days at first, with walking or light activity on rest days.
Warm-Up (3 Minutes)
March in place for 45 seconds, letting your arms swing naturally. Do arm circles, forward and reverse, for 30 seconds, then hip circles for 30 seconds. Finish with five slow chair squats, only as low as comfortable, and five gentle side steps each way.
A warm-up should raise your heart rate and loosen joints, not tire you out. If you are already warm from walking or housework, keep it to two minutes. If you feel stiff in the morning, take the full three minutes and move slowly.
The Circuit (14 Minutes)
| Order | Exercise | Work | Rest |
| 1 | Bodyweight squat | 10–12 reps | 30 seconds |
| 2 | Incline or wall push-up | 6–10 reps | 30 seconds |
| 3 | Glute bridge | 12 reps | 30 seconds |
| 4 | Reverse lunge | 6–8 reps each leg | 30 seconds |
| 5 | Knee or incline plank | 20–30 seconds | 30 seconds |
| 6 | Dead bug | 6 reps each side | 30 seconds |
| 7 | March in place | 45 seconds | 30 seconds |
Do the circuit, rest 60–90 seconds, and repeat. Week 1 is 2 rounds, week 2 is 2–3 rounds, week 3 is 3 rounds, and week 4 is 3 rounds with shorter rests. That progression is simple, measurable, and safe for most beginners.
Cool-Down (3 Minutes)
Walk slowly around the room for one minute, then stretch gently: calves, thighs, chest, and back, holding each stretch for 20–30 seconds without bouncing. Breathe normally, and do not force a stretch into pain. A cool-down should leave you calm, not stiff or dizzy.
Easier Version of Every Move
| Move | Easier version |
| Bodyweight squat | Chair squat, shorter range |
| Push-up | Wall push-up, higher incline |
| Glute bridge | Smaller lift, shorter hold |
| Reverse lunge | Hold a wall, shorter step |
| Plank | Knee plank, incline plank |
| Dead bug | Smaller arm/leg range, one limb at a time |
| March | Slow march, hold a chair |
Harder Version of Every Move
| Move | Harder version |
| Bodyweight squat | 3-second descent, pause at bottom |
| Push-up | Floor push-up, pause at bottom |
| Glute bridge | Single-leg bridge, 2-second hold |
| Reverse lunge | Walking lunge, pause at bottom |
| Plank | Full plank, shoulder tap (hips still) |
| Dead bug | Full range, slower tempo |
| March | High knees (only if joints allow) |
30-Minute No-Equipment Workout for Intermediate Trainers
Thirty minutes adds volume and a second strength block, not just more cardio. Use it when 20 minutes feels easy for two weeks in a row, and your form stays clean in the last round. Do it 3 days a week, with at least one rest day between hard sessions.
30-Minute Structure
| Block | Time | What to do |
| Warm-up | 5 minutes | March, arm/hip circles, easy squats, side steps |
| Strength block 1 | 10 minutes | Squat, push-up, bridge, lunge — 3 rounds |
| Strength block 2 | 10 minutes | Bird dog, Superman, side plank, calf raise — 3 rounds |
| Cardio finisher | 3 minutes | March, step jacks, shadow boxing — 40 seconds on, 20 off |
| Cool-down | 2–3 minutes | Slow walk + gentle stretches |
Intermediate Circuit Table
| Exercise | Sets | Reps / Time |
| Bodyweight squat with pause | 3 | 12–20 reps |
| Push-up | 3 | 8–15 reps |
| Reverse lunge | 3 | 8–12 reps each leg |
| Single-leg glute bridge | 3 | 8–12 reps each leg |
| Reverse snow angel | 3 | 10–15 reps |
| Plank | 3 | 30–60 seconds |
| Mountain climber (slow) | 3 | 30–45 seconds |
Rest 60–120 seconds between strength moves and 45–90 seconds for core or conditioning. Stop each set while form is still clean, not after it collapses. More rounds only help if reps still look like reps.
Advanced Ladder (Use Only When Ready)
Advanced bodyweight work uses leverage, not weights: diamond push-ups, archer push-ups, pistol squat progressions, single-leg deadlifts, and plank-to-push-up combos. Do 4–5 rounds, with longer rest for strength moves, and keep one hard variation per session, not five at once. Advanced does not mean reckless, and a pistol squat done badly is worse than a clean chair squat done well.
Low-Impact Workout at Home Without Equipment (No Jumping, Quiet)
Low impact does not mean low value, it means no hopping or pounding, which is gentler on knees, ankles, hips, and neighbours. This version is ideal for apartments, upstairs rooms, early mornings, and joint-sensitive users. It keeps heart rate up through continuous movement, not through jumping.
No-Jump Swap Table
| Jumping move | Quiet, low-impact swap |
| Jumping jack | Step jack (step one leg out at a time) |
| Jump squat | Tempo squat (3 seconds down) |
| Burpee | Step-back burpee, no jump |
| High knees | Standing knee lift, marching |
| Mountain climber (fast) | Slow mountain climber, or dead bug |
| Skater jump | Side step with arm reach |
| Jump lunge | Reverse lunge, pause at bottom |
Apartment-Friendly Routine (20 Minutes, Quiet)
| Order | Exercise | Work |
| 1 | March in place | 45 seconds |
| 2 | Chair squat | 10 reps |
| 3 | Wall push-up | 10 reps |
| 4 | Glute bridge | 12 reps |
| 5 | Side step with arm raise | 45 seconds |
| 6 | Bird dog | 6 reps each side |
| 7 | Standing knee lift | 45 seconds |
Do 2–3 rounds on a mat or carpet, land softly, and keep feet low. If you live upstairs, train in socks or soft shoes on carpet, and avoid hard landings entirely. Quiet training is a feature, not a compromise, because it lets you train at 6 a.m. without waking anyone.
Tips for Joint-Friendly Training
- Use a mat or carpet to soften the floor for knees and elbows.
- Keep movements smooth and controlled, with no bouncing at the bottom.
- Reduce range if a joint feels tight, and build range over weeks.
- Avoid locking knees or elbows at the top of a rep.
- Stop any move that causes sharp joint pain, and note it for your next session.
Workout at Home Without Equipment for Seniors and Bad Knees
Seniors benefit most from strength, balance, and mobility, not from high-impact cardio. The CDC older-adult guidance adds balance work to aerobic and muscle-strengthening activity, and that balance work belongs in every senior routine. Chair and wall support make that work safe and repeatable.
Chair and Wall-Supported Routine
| Exercise | Reps / Time | Support |
| Sit-to-stand (chair squat) | 8–10 reps | Chair, no hands if possible |
| Wall push-up | 8–10 reps | Wall, feet close to wall |
| Glute bridge | 10–12 reps | Floor, small lift |
| Standing march | 45 seconds | Chair back for balance |
| Calf raise | 10 reps | Wall or chair for balance |
| Standing hip abduction | 8 reps each leg | Wall for balance |
| Seated knee lift | 8 reps each leg | Sturdy chair, no wheels |
Do this routine 2–3 days a week, with at least one rest day between sessions. Start with one round, add a second round when the first feels easy, and keep the chair close even when you no longer need it. Confidence matters as much as strength for older adults, and support builds both.
Balance Moves That Matter After 60
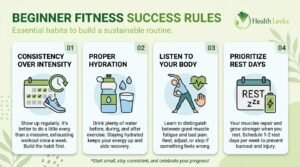
Balance training is not a bonus for seniors, it is a core part of the program. Single-leg stands with wall support, heel-to-toe walking along a wall, and slow weight shifts all improve stability for daily life. Do balance work when you are fresh, not tired at the end, and always have support within reach.
Bad-Knee Rules
For bad knees, shorten squat and lunge range, use chair support, and favour glute bridges, calf raises, and wall work over deep knee bends. Strengthen hips and glutes first, because weak hips often load knees more than the knee itself. If pain is sharp, swelling, locking, or giving way, stop and seek clinician advice rather than pushing through.
How to Progress Without Weights: The 8 Levers
Bodyweight training works best when you treat it like progressive overload, not random sweat. Progressive overload means gradually increasing challenge over weeks, so the body adapts and gets stronger. Use one lever at a time, not all eight at once, and track the change.
1. Add Reps
Example: 3 sets of 8 push-ups becomes 3 sets of 10 push-ups. Add reps only while form stays clean, and stop 1–2 reps before form breaks. That “reps in reserve” rule protects joints and keeps progress honest.
2. Add Sets
Example: 2 sets of lunges becomes 3 sets of lunges. Add a set when the last set feels easy, not when you are already exhausted. More sets add volume, which is the simplest way to build endurance and muscle for beginners.
3. Slow the Tempo
Example: 3 seconds down on squats, 1 second pause, 1 second up. Slower tempo increases time under tension, the time a muscle works during a set. It makes an easy move hard without adding weight or jumping.
4. Add Pauses
Example: pause at the bottom of a push-up, or at the top of a glute bridge. Pauses remove momentum, so the muscle does the work instead of bounce. Use a 1–2 second pause first, and build to 3 seconds only when form stays clean.
5. Increase Range of Motion
Example: deeper lunges, if pain-free, or a fuller squat over weeks. Range should grow gradually, not forced in one session. If deeper range causes joint pain, return to the pain-free range and build hip and ankle mobility separately.
6. Use Harder Variations
Example: incline push-up → floor push-up → pause push-up → diamond push-up. Harder variations change leverage, so the same body weight feels heavier. Change one move at a time, and keep the rest of the routine familiar.
7. Shorten Rest Carefully
Example: rest 90 seconds becomes rest 60 seconds between rounds. Shorter rest is good for conditioning, less important for maximal strength, and it should never come at the cost of form. If form collapses, rest longer, not shorter.
8. Increase Weekly Frequency
Example: 2 sessions becomes 3 sessions when recovery is good. Frequency helps only if soreness fades between sessions and sleep is adequate. If you are still very sore after 48 hours, stay at 2 sessions and build slowly.
Move-by-Move Progression Ladder Table
| Move | Beginner | Intermediate | Advanced |
| Squat | Chair squat | Bodyweight squat, tempo | Tempo squat, single-leg squat progression |
| Push-up | Wall push-up | Floor push-up, pause | Diamond, archer, pseudo-planche progression |
| Bridge | Small glute bridge | Single-leg bridge | Single-leg bridge, hold |
| Lunge | Supported reverse lunge | Reverse lunge, walking lunge | Jump-free split squat, single-leg deadlift |
| Plank | Knee plank | Full plank, shoulder tap | Plank to push-up, side plank |
| Core | Dead bug, small range | Dead bug, bird dog | Hollow hold, slow mountain climber |
4-Week No-Equipment Workout Plan (Printable)
A plan beats a single workout, because it tells you what to do next week, not just today. This plan uses the 20-minute routine, adds volume slowly, and includes a deload-style easier week if you feel very sore. Print it, tick each session, and write reps and hold times in the tracker.
Week 1: Learn Form
Do the 20-minute routine 2 days a week, 2 rounds each session. Use easier versions where needed, and focus on form, not speed. Walk on other days, and note which move felt hardest in your tracker.
Week 2: Add a Round
Do the routine 2–3 days a week, 2–3 rounds each session. Keep the same moves, but add one round to the session that felt easiest last week. If soreness lasts more than 48 hours, stay at 2 days and do not add volume yet.
Week 3: Add Tempo and Pause
Do the routine 3 days a week, 3 rounds each session, with a 2-second descent on squats and a 1-second pause on push-ups and bridges. Tempo makes the same reps harder without new moves, and it is the safest way to progress for most beginners.
Week 4: Shorter Rest, Same Form
Do the routine 3 days a week, 3 rounds, with rest cut from 30 seconds to 20 seconds between moves, and 60 seconds between rounds. If form breaks in round 3, return to 30-second rests and note that as your current limit. That limit is data, not failure.
What to Do After Week 4
Repeat the plan at the next level: use harder variations for one move per session, or move to the 30-minute routine. Test yourself with the same routine you did in week 1, and compare reps, hold time, and rest needed. Improvement in any of those three is real progress, even if weight has not changed.
Printable Tracker Table
| Week | Sessions | Rounds | Hardest move | Notes |
| 1 | 2 | 2 | ||
| 2 | 2–3 | 2–3 | ||
| 3 | 3 | 3 | ||
| 4 | 3 | 3, shorter rest |
Form Mistakes to Fix First
Form matters more than reps, because bad form loads joints instead of muscles. Fix one mistake per session, not five at once, and film yourself from the side if you can. A phone video reveals knee collapse and plank sag faster than feeling alone.
Squat Mistakes
Knees collapsing inward is the most common squat mistake, and it often comes from weak glutes or too-deep range too soon. Push knees gently outward, shorten range, and use a chair squat until control improves. Heels lifting off the floor is another sign to shorten range and work ankle mobility separately.
Push-Up Mistakes
Hips sagging, elbows flaring wide, and half-range reps are the three push-up mistakes to fix first. Squeeze glutes, keep elbows at about 45 degrees, and lower your chest fully with control. If you cannot keep a straight line, raise the incline — a clean incline push-up beats a sagging floor push-up every time.
Lunge Mistakes
Front knee drifting past the toes too far, back knee slamming the floor, and leaning forward are common lunge mistakes. Step shorter, lower slowly, and keep your chest tall with weight in the front heel. Hold a wall until balance is steady, then remove support gradually.
Plank and Bridge Mistakes
A sagging plank loads the lower back, not the core, so squeeze glutes, tuck ribs down, and shorten hold time if sag appears. A bridge that arches the back instead of squeezing glutes is the same problem in reverse. Lift only until your body is straight, squeeze glutes, and lower slowly.
Form Mistake to Fix Table
| Mistake | Fix |
| Knees collapse in squat | Shorten range, push knees out, chair squat |
| Plank hips sag | Squeeze glutes, shorten hold, knee plank |
| Push-up elbows flare | Elbows at 45°, raise incline, full range |
| Lunge knee drifts | Shorter step, front heel pressure, wall support |
| Bridge back arches | Lift to straight line only, squeeze glutes |
| Dead bug back lifts | Smaller range, one limb at a time, exhale |
Cardio vs Strength at Home: How to Mix Your Week
Cardio and strength do different jobs, and you need both for general health. Cardio improves heart and lung fitness, strength improves muscle, bone, balance, and daily function. A home plan that is only HIIT, or only slow strength, misses half the benefit.
CDC Weekly Target: 150 Minutes Plus 2 Strength Days
The CDC adult guidance states adults need 150 minutes of moderate-intensity activity and 2 days of muscle-strengthening activity per week, based on the Physical Activity Guidelines for Americans. Moderate means breathing and heart rate are noticeably faster, but you can still talk. Vigorous means breathing is too hard to talk comfortably.
That target can be split across the week, for example 30 minutes on five days, or shorter bouts that add up. Some activity is better than none, especially for beginners starting from little activity. Use the target as a direction, not a pass-or-fail score for a single week.
Sample Weekly Schedules
| Schedule | Strength | Cardio / Walking | Rest |
| 2-day starter | Mon, Thu: 20-min routine | Tue, Sat: 20-min walk | Wed, Fri, Sun: rest / light stretch |
| 3-day core | Mon, Wed, Fri: 20-min routine | Tue, Thu: 20–30-min walk | Sat: light activity, Sun: rest |
| 5-day mixed | Mon, Wed, Fri: 30-min routine | Tue, Thu: 20-min cardio (march, step jacks, shadow boxing) | Sat, Sun: walk / rest |
HIIT vs Steady Strength Circuits
HIIT uses short, hard intervals (for example 40 seconds work, 20 seconds rest) for cardio and conditioning. Steady strength circuits use slower, controlled reps with longer rest for muscle and form. Beginners should start with steady strength, add HIIT only when form is solid, and keep HIIT to 1–2 days a week at first.
Recovery, Soreness, and When to Stop
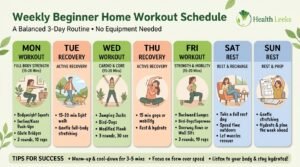
Recovery is part of training, not a break from it. Muscles adapt during rest, sleep, and normal eating, not during the workout itself. A plan without rest days will stall faster than a plan with slightly fewer sessions.
Soreness vs Pain
Delayed onset muscle soreness (DOMS) is dull, widespread muscle soreness 24–72 hours after new or harder work, and it fades with light movement. Sharp, localised joint pain, swelling, locking, giving way, or pain that worsens over days is different, and it is a stop signal. If pain persists, seek clinician advice rather than training through it.
Sleep, Food, and Hydration Basics
Sleep 7–9 hours where possible, eat normal balanced meals with protein, and drink water before, during, and after training. No special supplement is required for beginner bodyweight routines, and no diet prescription belongs in a workout article without individual context. Hydration and sleep affect recovery more than any supplement for most beginners.
Return After a Break
After a week off, restart at the easier version for one session, then return to your previous level. After a month off, restart at week 1 of the 4-week plan. Do not double sessions to “catch up,” because that creates soreness and form breakdown, not faster progress.
When to Stop and Seek Care
Stop immediately for chest pain, severe breathlessness, dizziness, fainting, sharp joint pain, or pain that worsens during a move. Seek urgent care for chest pain, fainting, or severe breathlessness. For persistent joint pain, swelling, or numbness, seek clinician advice before continuing that move.
Bodyweight vs Weights vs Resistance Bands
No single tool wins for everyone, and honest comparison helps readers choose, not just buy. Bodyweight wins on access, cost, and space, weights win on easy load progression, and bands win on portability and pulling options. Use the comparison below to decide, not to argue.
Comparison Table
| Feature | Bodyweight | Weights | Resistance bands |
| Cost | Free | Higher, one-time purchase | Low–medium |
| Space | Floor only | Needs storage, floor space | Pocket-sized |
| Progression | Tempo, leverage, variation | Add weight easily | Add band tension |
| Pulling / back | Limited without bar | Rows, pull-downs easy | Rows, pull-aparts easy |
| Best for | Beginners, travel, apartments | Maximal strength, easy loading | Travel, rehab-style pulling, variety |
| Main drawback | Pulling gap, ceiling for advanced strength | Cost, space, safety with heavy loads | Tension varies, durability varies |
Should You Add Equipment Later?
Add equipment only when bodyweight progression stalls for a specific goal, not because an ad says you need it. A pull-up bar solves the pulling gap, bands add pulling and leg resistance, and dumbbells add easy loading for squats and presses. Until then, bodyweight alone is a complete starter system, and adding gear too early often adds clutter, not progress.
Expert Tips for a Workout at Home Without Equipment
- Start with form, not speed. Clean reps build strength, fast sloppy reps build bad habits.
- Stop 1–2 reps before form breaks. That reps-in-reserve rule is the beginner safety rule that matters most.
- Use one progression lever at a time. Add reps, or tempo, or a harder variation — not all three in one week.
- Track reps, hold time, and rest. Those three numbers prove progress better than weight or photos alone.
- Do the quiet version when in doubt. Step jacks, marching, and tempo squats keep you consistent in apartments.
- Train back as well as chest. Superman, reverse snow angel, and wall angels balance push-up work.
- Keep a fixed time and place. Same time, same spot, same mat — habit beats motivation.
- Walk on rest days. Walking adds CDC minutes without loading the same muscles hard.
- Film one set per week. A side view reveals knee collapse and plank sag faster than feeling.
- Repeat the plan, then level up. Four weeks at one level, then one harder variation per session, is sustainable progress.
FAQs
Can you build muscle with bodyweight workouts?
Yes, for beginners and intermediates, by progressing reps, tempo, range, and variation over weeks. Advanced lifters eventually need harder leverage or added load for maximal strength, especially for pulling.
Can you lose weight with no equipment workouts?
Exercise helps, but weight change depends mainly on total activity, diet, and sleep. No workout alone guarantees fat loss, and no exercise causes spot reduction in one body area.
How long should a home workout be?
Ten minutes is a good start, and 20–30 minutes, 3 days a week, covers most beginner goals. Add time only when the routine feels easy with clean form.
How many times a week should I work out at home?
Start 2–3 days a week for strength, with rest days between hard sessions. Walk or do light activity on other days to reach CDC weekly minutes.
What is the best no equipment workout for beginners?
Squat, wall or incline push-up, glute bridge, reverse lunge, dead bug or bird dog, plank, and marching, for 2–3 rounds. That set covers legs, push, hinge, lunge, and core in one routine.
Do I need equipment to get fit at home?
No. A floor, chair, and wall are enough to start, and a mat is optional comfort, not a requirement. Add equipment only when a specific goal stalls.
How do I progress bodyweight exercises without weights?
Add reps, sets, slower tempo, pauses, deeper range, harder variations, shorter rest, or more sessions per week. Use one lever at a time and track the change.
What exercises can I do at home without equipment?
Squats, lunges, push-ups, planks, bridges, dead bugs, bird dogs, Supermans, marching, step jacks, and shadow boxing. Those moves cover full-body strength and cardio without any gear.
Is 20 minutes of bodyweight exercise enough?
Yes for beginners, especially 3 times a week plus walking. Increase time, rounds, or difficulty only when 20 minutes feels easy with good form.
Can I work out at home every day?
Light movement daily is fine, but hard strength work needs rest days for the same muscles. Daily hard HIIT or same-muscle training risks soreness and form breakdown.
What is a good warm-up before a home workout?
Three to five minutes of marching, arm circles, hip circles, and easy squats. Warm up until you feel loose and slightly warm, not tired.
How do I do a workout in a small apartment without jumping?
Use marching, step jacks, no-jump burpees, chair squats, and wall work, with soft landings on a mat or carpet. Keep feet low and train in the largest clear floor area you have.
Are bodyweight workouts effective for strength?
Yes when taken close to good-form failure and progressed over weeks, following progressive overload principles. Tempo and harder variations are the main tools when weight cannot be added.
How do I start working out at home as a beginner?
Pick five moves, do two rounds, 2–3 days a week, and stop 1–2 reps before form breaks. Track reps and hold time, and add a round or tempo only when form stays clean.
What should I eat after a home workout?
Eat a normal balanced meal with protein and fluids, and drink water. No special supplement is required for beginner bodyweight routines.
What if I cannot do a push-up yet?
Start with wall push-ups, then incline, then knee, then floor push-ups. Lower the incline as you get stronger, and keep a straight line from head to heels.
What is a good no-jump alternative to burpees?
Step back into a plank, step forward, and stand with a reach, without jumping. That step-back burpee keeps the full-body pattern without impact or noise.
How do I work my back without a pull-up bar?
Use Superman, reverse snow angel, prone Y/W raises, and wall angels. Pulling strength is limited without a bar, so be honest about that gap and add a bar or bands later if back strength is a priority.
What if I have bad knees?
Use chair squats, shorter range, wall support, glute bridges, and low-impact cardio. Stop for sharp joint pain, and seek clinician advice if pain, swelling, or giving way persists.
How long until I see results from bodyweight training?
Strength and energy often improve in 2–4 weeks, while visible changes take longer and vary by diet, sleep, and consistency. Track reps, hold time, and rest needed, not only weight or photos.
Conclusion
A good home routine does not need more exercises, it needs the right five patterns, done well, progressed slowly, and repeated for four weeks. Start with the 20-minute circuit, use easier versions without shame, and add tempo or a harder variation only when form stays clean.
That is the whole system behind a workout at home without equipment: squat, push, hinge, lunge, and brace, plus walking, rest, and a tracker. Do the 10-minute version today if time is short, do the 20-minute version tomorrow if you can, and let the 4-week plan carry you past the first hard week.
Start today, track one session, and repeat it 2–3 days a week. Your strongest home routine is the one you actually do, in the space you already have, with the body weight you already carry.






1 thought on “Workout at Home Without Equipment: The Complete Bodyweight Guide for Beginners”